Lab Collaborators and Lab Readers#
Upload a sequence file (GUI)#
GUI upload is the simplest way to get files into APGAP. Use this for single files or small batches where you want to upload through your browser.
- Click Labs in the sidebar
- Select your lab
- Click the Sequences tab
- Click Upload Sequences → GUI Upload
- In the dialog that appears, drag and drop your file(s) or click the upload area to browse
- Click Upload Files to confirm Your file will show a status of PROCESSING for about 30–60 seconds while APGAP scans and registers it. When complete, the status will update to UPLOADED or DRAFT. Tip: You can upload multiple files at once using GUI upload. All files will share the same upload session.
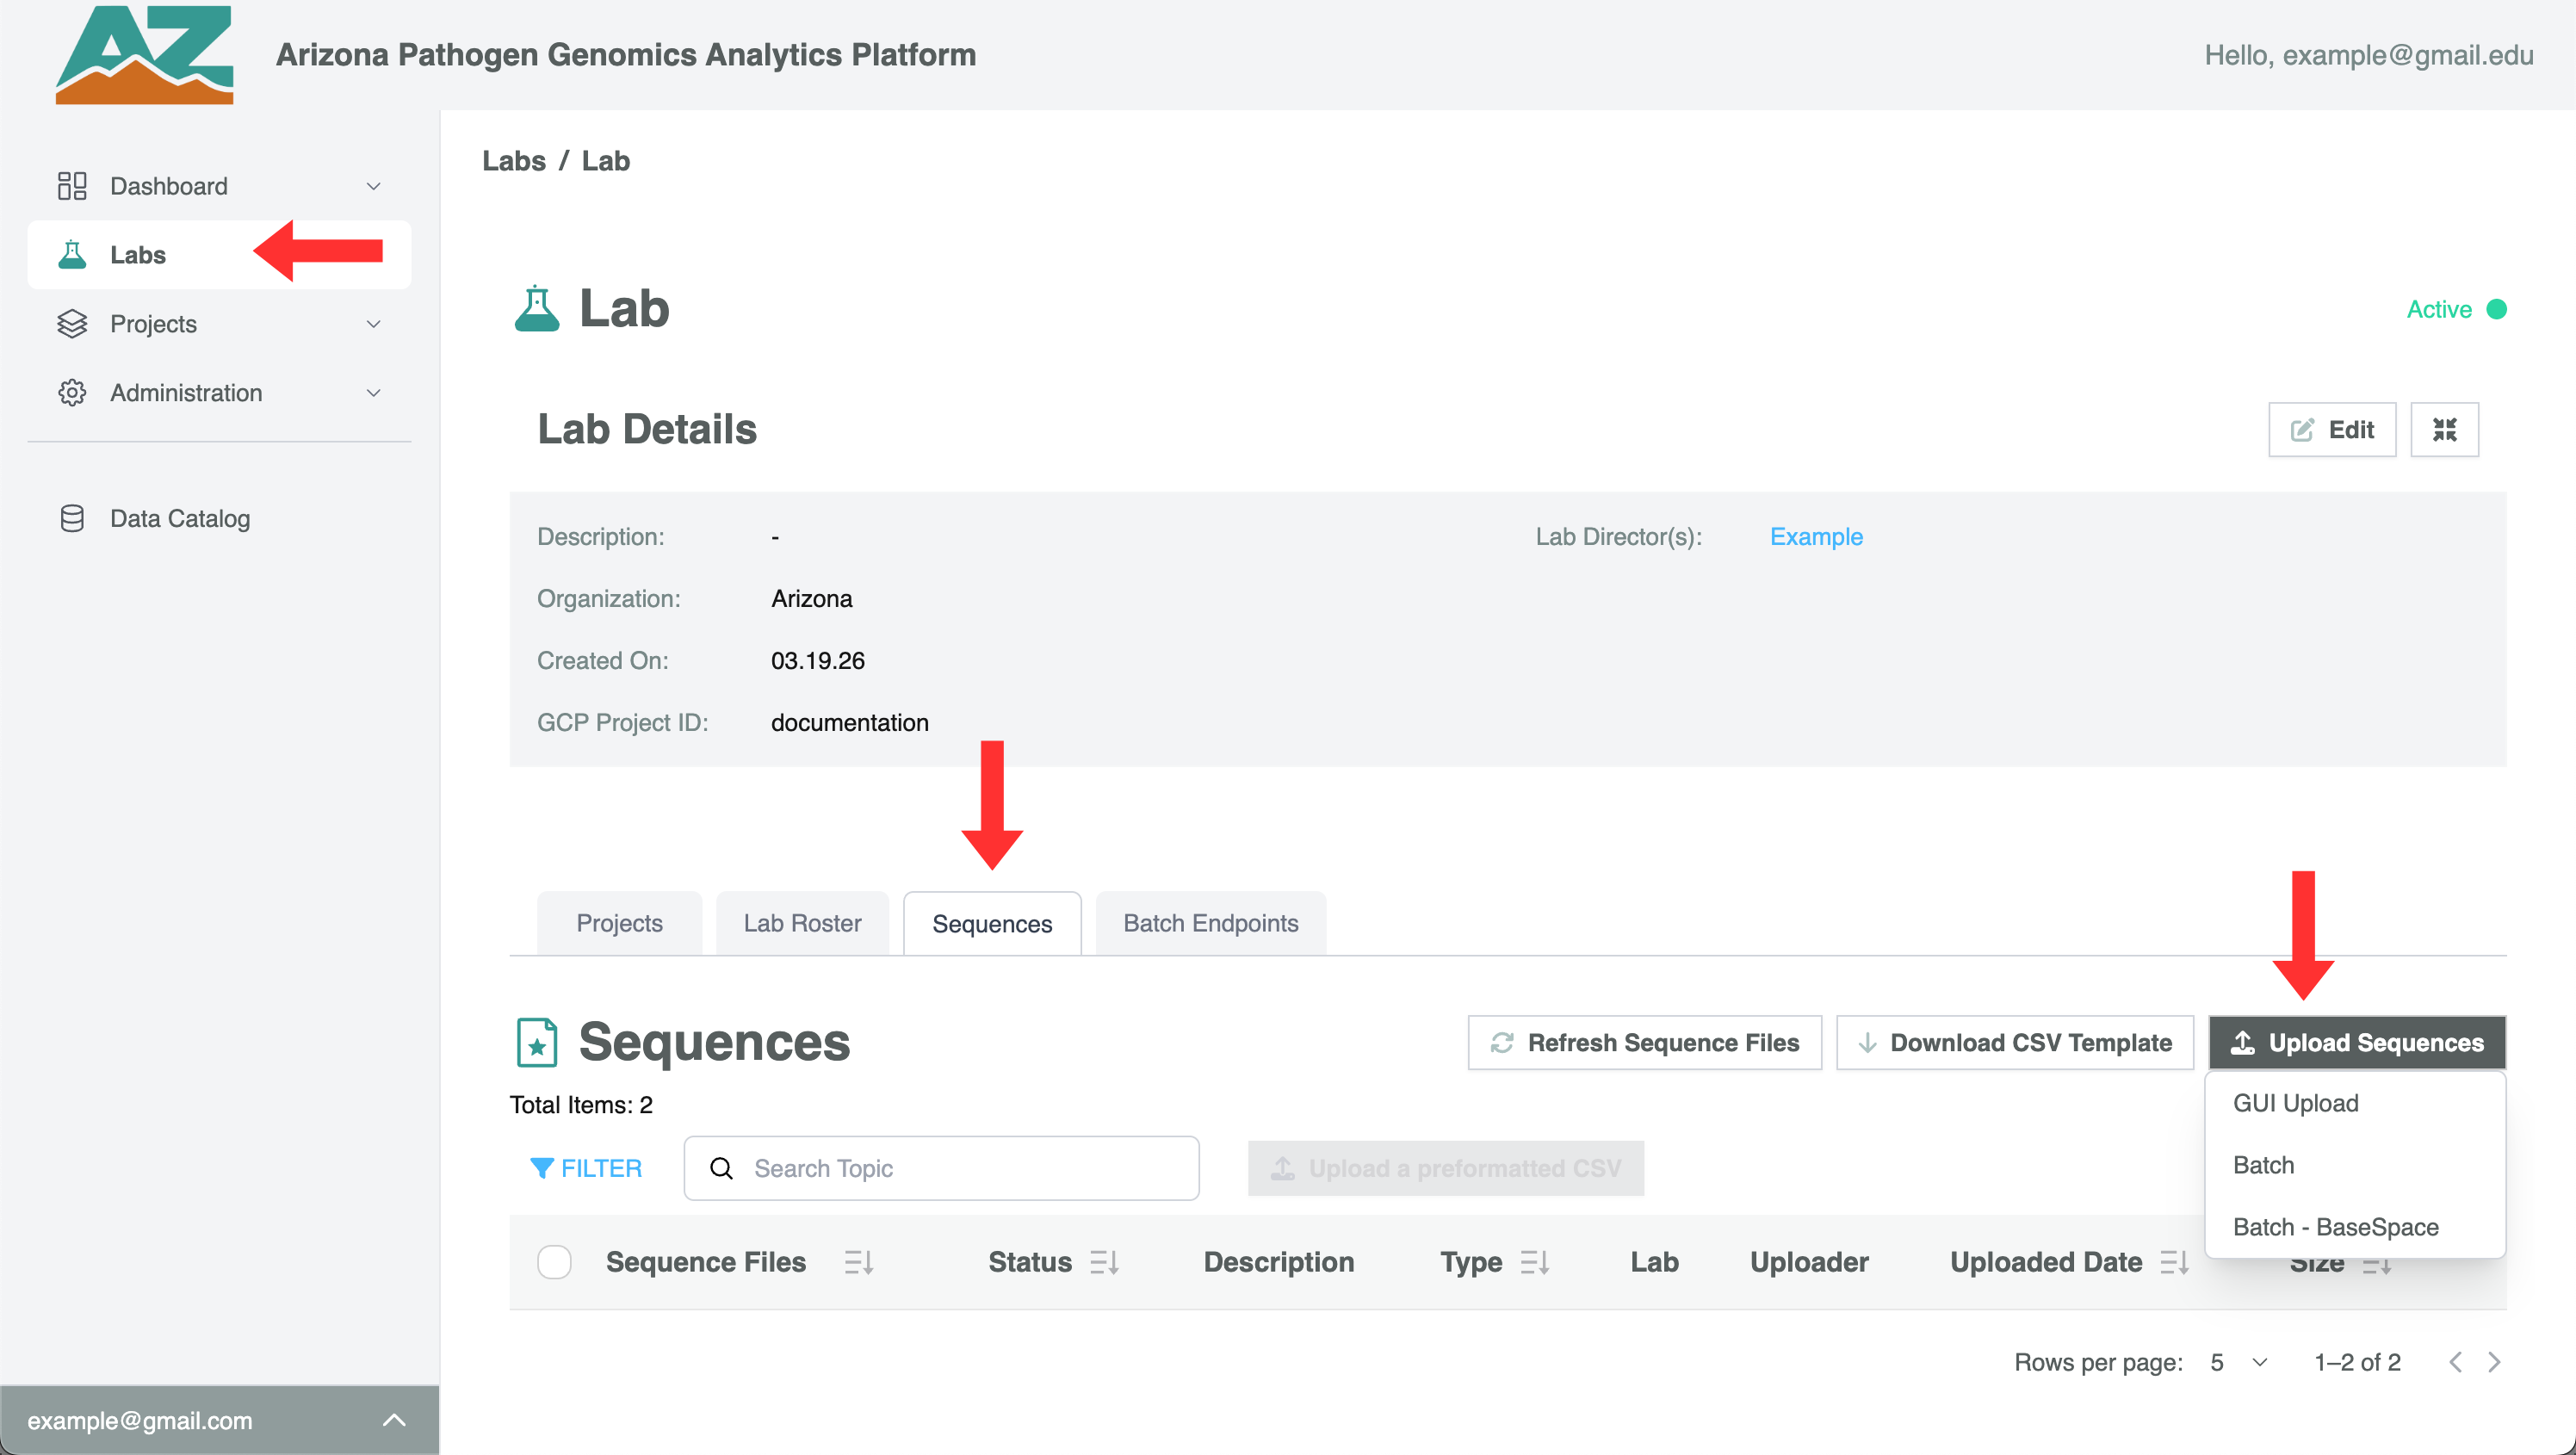
Upload sequence files in bulk (Batch)#
Batch upload is designed for large volumes of files. Instead of uploading through your browser, APGAP creates a secure Google Cloud Storage endpoint that you transfer files to directly — useful for automated pipelines or very large files.
Step 1 — Create a batch endpoint:
- Click Labs → select your lab → Sequences tab
- Click Upload Sequences → Batch
- Select the Lifetime Duration for the endpoint (how long the upload window stays open)
- Enter a description to identify this batch
- Click Confirm
APGAP will create a GCS bucket and generate a JSON key for authentication. You’ll see the endpoint details in the Batch Endpoints tab.
Step 2 — Use the endpoint:
- Click Labs → your lab → Batch Endpoints tab
- Find your endpoint and download the JSON key
- Use the Google Cloud CLI or your preferred GCS client to transfer files to the bucket Files transferred to the batch bucket are automatically ingested into APGAP. They will appear in the Sequences tab as they are processed.
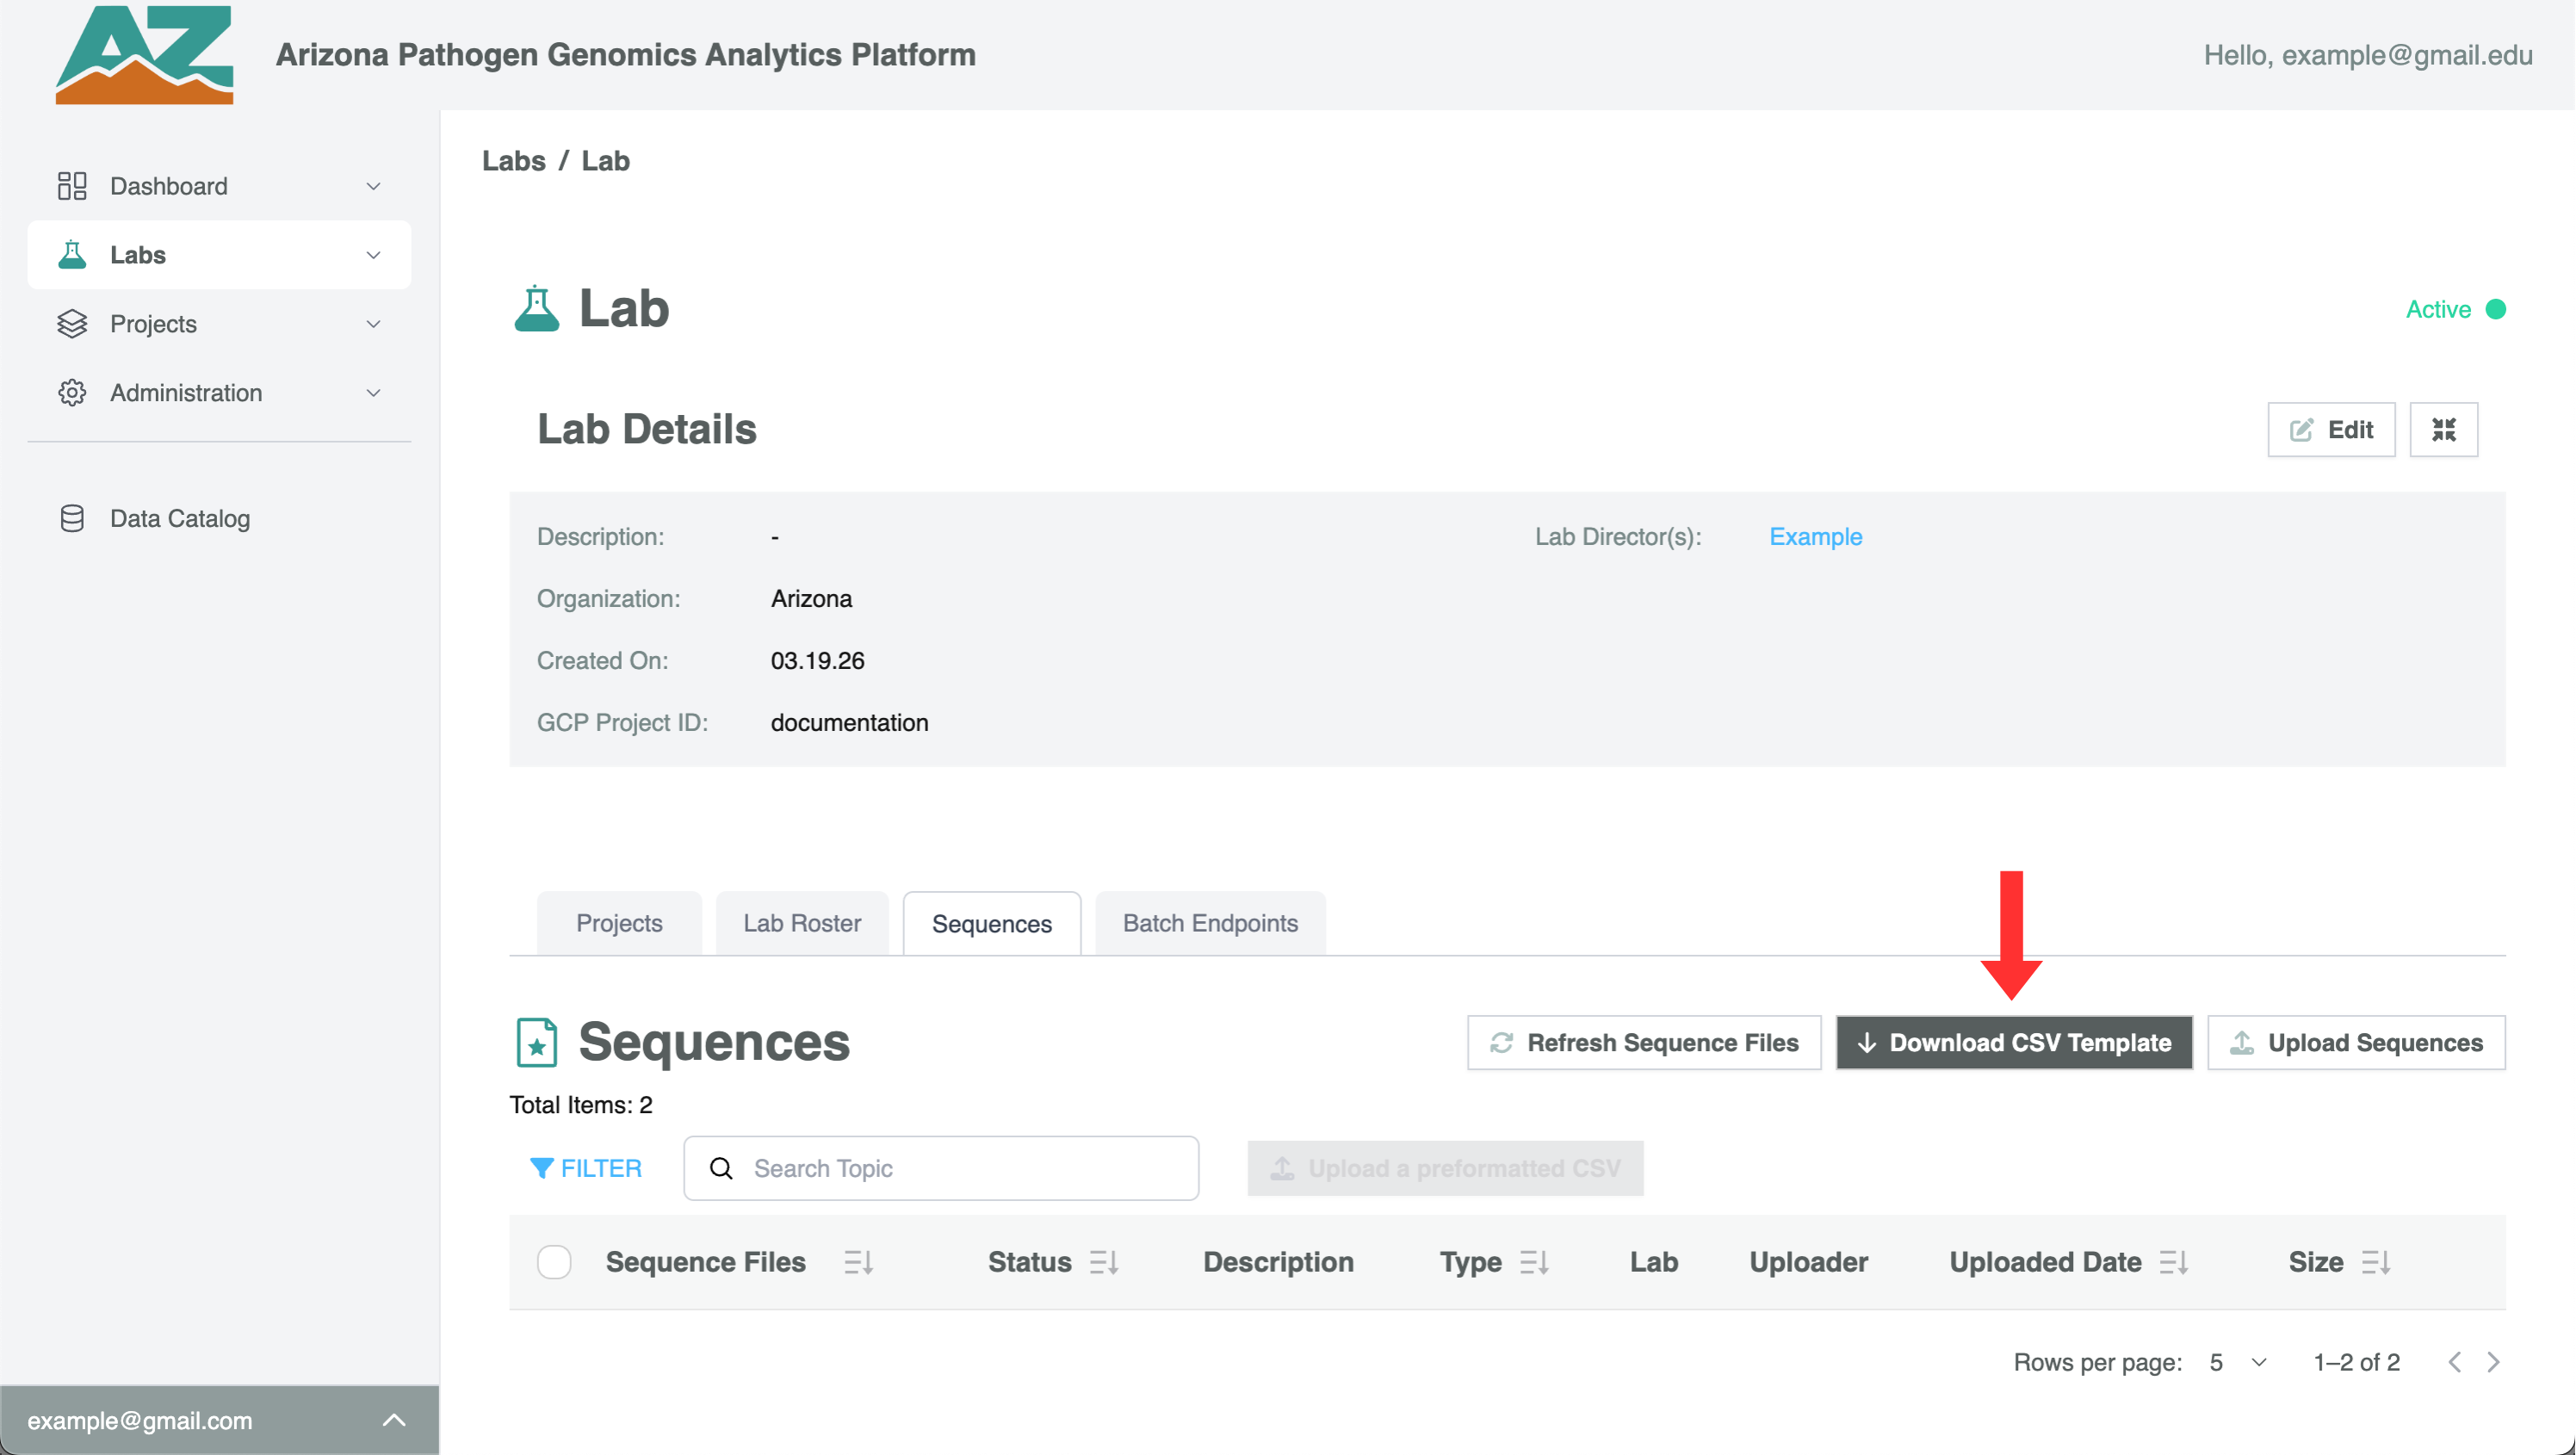
Download a metadata CSV template#
Metadata tells APGAP what each sequence file represents — the organism, collection date, location, and other scientific details. APGAP uses Source Types (Human, Wastewater, Wildlife, Animal/Livestock, etc.) to determine which fields are required.
- Click Labs → select your lab → Sequences tab
- Click Download CSV Template
- Select your Source Type from the dropdown
- Click Download
The CSV will download to your browser’s default download folder. It’s strongly recommended to rename the file before filling it in so you can track which batch it belongs to.
Understanding the CSV template:
- Row 1 — Column headers (field names). Do not modify these.
- Row 2 — Shows REQUIRED or OPTIONAL for each field. Do not modify this row.
- Rows 3 onwards — Add one row per file
The first column is always filename. This must contain the exact filename as it appears in APGAP, including the file extension and matching case.
Note: If your Platform Admin has added custom metadata fields via Metadata Management, those fields will appear in the template automatically.
Fill in a metadata CSV#
Once you’ve downloaded a template, fill it in following these rules:
Filename column (required for every row)#
The filename must exactly match the file’s name as it appears in the Sequences tab. Check for:
- Correct capitalization (APGAP is case-sensitive here)
- No extra spaces before or after the filename
- The correct file extension (e.g., .fastq, .fastq.gz, .fasta)
Required fields#
Fields marked REQUIRED in Row 2 must have a value for the file to advance from DRAFT to PRIMARY status. Leaving a required field blank will cause that row to remain in DRAFT.
Controlled vocabulary fields#
Some fields accept only values from a defined list — for example, organism names must match the values configured in your platform’s Metadata Management settings. If you enter a value that doesn’t match, the row will not be processed.
Common controlled vocabulary fields include:
- Organism / Pathogen Name
- Biospecimen Type
- Source Type
- Sequencing Platform
Date fields#
Dates should be entered in YYYY-MM-DD format (e.g., 2026-03-15). Other formats may be accepted but can cause inconsistencies — stick to the ISO format to be safe.
Numeric fields#
Fields like Age or Ct Value should contain numbers only (e.g., 35, not thirty-five or N/A). If a value is not available, leave the field blank rather than entering a placeholder.
After filling in the CSV:#
Save the file in CSV format (not XLSX). If you opened it in Excel or Numbers, be sure to save as CSV before importing.
Import a completed metadata CSV#
- Click Labs → select your lab → Sequences tab
- Click Upload a preformatted CSV (or navigate to Metadata → Import CSV depending on your version)
- Select your Source Type from the dropdown — this must match the Source Type you used when downloading the template
- Click Choose File and select your completed CSV
- Click Import
The import results will show:
- How many rows were successfully processed
- Any rows that had errors, with a description of what went wrong
Errors are row-specific — a problem in one row does not prevent other rows from being processed. Fix the errors in your CSV and re-import. Existing metadata is not overwritten unless you provide a new value for the same field. Common import errors:
| Error message | Cause | Fix |
|---|---|---|
| “File not found” | Filename in CSV doesn’t match APGAP | Check spelling, capitalization, and extension |
| “Invalid value for [field]” | Value not in controlled vocabulary | Check Metadata Management for valid values |
| “Required field missing” | A REQUIRED field has no value | Fill in the missing value |
| “Invalid date format” | Date not in YYYY-MM-DD format | Reformat dates |
Add or edit metadata for a single file#
For one-off updates to individual files, you can edit metadata directly in the UI without using a CSV.
- Click Labs → your lab → Sequences tab
- Click the filename of the file you want to update
- Click Add Metadata (if no metadata exists) or Edit Metadata
- Fill in or update the fields
- Click Save
Fields marked with a red asterisk are required for PRIMARY status. You can save partial metadata — the file will remain in DRAFT until all required fields are complete.
Check and understand file status#
Every file has a status shown in the Sequences tab. Here’s what each status means and what to do:
| Status | Meaning | What to do |
|---|---|---|
| PROCESSING | File is being scanned and registered | Wait 1–2 minutes and refresh |
| DRAFT | File stored; required metadata fields are incomplete | Add metadata via the UI or CSV upload |
| PRIMARY | File has complete metadata; available for analysis | Nothing — the file is ready |
| PII_DETECTED | File was flagged for potential personal information | Contact your Lab Director immediately |
| FAILED | A processing error occurred | Contact your Lab Director |
| ARCHIVED | File has been archived to external storage | Contact your Lab Director if you need access |
A note on DRAFT files: A file in DRAFT is safely stored — it isn’t lost or corrupted. The DRAFT status simply means required metadata fields are incomplete. Once you add the missing metadata, the file will automatically advance to PRIMARY status. To find all DRAFT files in your lab, use the Filter or Search options in the Sequences tab to filter by status.
Request access to another lab’s files#
If you need data from another lab for your analysis, you can request access through the Data Catalog.
- Click Data Catalog in the sidebar
- Browse or search for the Analytical Dataset containing the files you need
- Select the specific files you need from the dataset
- Click Create Analytical Dataset
- Add a justification explaining why you need access
- Click Submit
The Lab Director who owns those files will receive a notification. You’ll be notified by email and in-app when they make a decision. If approved, the files will appear in your project for download and analysis.
Don’t see the dataset you need? The researcher who owns the data may need to create an Analytical Dataset first. Contact them directly or ask your Lab Director.
Archive a file#
Files in APGAP cannot be permanently deleted without going through an Archive Request. This ensures an auditable record of why files were removed.
- Navigate to the file you want to archive in the Sequences tab
- Click the file name to open the file detail view
- Click Request Archive
- Select the archive reason:
- NCBI SRA — the file has been deposited to NCBI SRA; enter the accession number
- Other — provide the external storage location and a justification
- Click Submit
Your Lab Director will receive a notification and must approve the request before the file is archived. You’ll be notified when a decision is made.